How to make, use, and freeze fresh basil pesto 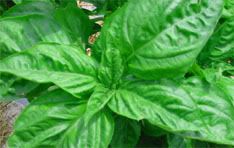
Basil pesto is delicious, but the price of prepared pesto is alarming: expect to pay $5 or more for as little as half a cup! It's amazing how something so expensive is so easy to make.
Fresh basil is easy to grow in the garden or on your windowsill. Take a pile of leaves, add some garlic, olive oil, and turn a cup of homemade pesto into three delicious meals - some left over to freeze for later. If you grow your own basil, ingredients for all three meals won't cost much more than that measly little jar of pesto from the supermarket.
Growing and Harvesting Your Own Basil
Growing basil is easy! The term "herb" denotes a plant that's valued for its taste or medicinal properties. Remember though, that another name for "herb" is "weed" as in "grows like a." Just ask any gardener who once planted "just a little" mint only to have it take over the garden in a single season.
The good news is that basil is a form of mint, but not nearly as invasive as its cousins peppermint and spearmint. Grow it from seed in pots or transplant seedlings into your garden once the weather is warm. Or, if you've bought some fresh-cut basil, take one of the stems (with leaves still attached) and keep it in a glass of water until the stem begins to root. Then, transplant it into a pot and it will grow into a whole new plant.
Harvest basil when the leaves are young and tender because they taste better a lot better! Beginning gardeners often hesitate to cut much off the plant, but cutting the leaves makes the plant grow new ones. If you don't keep the plant cut back, it will start to bloom and put more energy into flowering than making leaves. Also, the leaves from a blooming plant will have a sharper flavor that's not as good.

Be ruthless when you harvest. The plant signals that it's getting ready to bloom by forming this four-leaf arrangement at the top of the stem. Before the flowers start to form, pinch it back 2-3 inches or more to keep the plant producing leaves.
Three Pesto Recipes
Each recipe contains two common ingredients: pesto and cherry tomatoes. Sweet cherry tomatoes are about the only supermarket tomato that's reliably fit to eat all year round. They taste even better in the summer, straight out of your garden or the local farmer's market.
You can always substitute other tomato varieties too. Just make sure to use fresh tomatoes, not canned.
- 4 cups fresh basil leaves
- 4 garlic cloves, crushed
- ⅓ cup walnuts
- 4-6 tablespoons extra virgin olive oil
- ½ cup fresh grated Parmesan cheese (optional)
- ½ teaspoon lemon juice
- salt to taste
- In food processor, blend 1 cup basil leaves, garlic, walnuts, and olive oil, until everything is well-chopped. This pulverizes the garlic so it blends evenly into the pesto mix.
- Add remaining basil, Parmesan, and chop until mixture forms a paste. Add additional olive oil if needed to reach the desired texture.
- Add lemon juice and salt to taste. The lemon juice helps preserve the bright green color that otherwise fades quickly (within minutes) to a dull brown.
Note: traditionally, in Italy, pesto is prepared by hand. That's certainly an option, but it's a lot of chopping!
Prep Time: 5 minutes
Cook Time: 25 minutes
Yield: 2
- ½ pound dried pasta
- 2 cups cherry tomatoes, cut in half
- 3-4 tablespoons pesto (to taste)
- 4-6 fresh basil leaves for garnish
Cook pasta according to package directions and drain. Add pesto to the hot pasta and stir to coat evenly. Top with cherry tomatoes and fresh basil leaves.
Prep Time: 5 minutes
Cook Time: 25 minutes
Yield: 2
- 1 prepared focaccia loaf (be prepared to pay $3 or more per loaf)
- 2 cups sliced fresh tomatoes (sweet cherry tomatoes complement the pesto perfectly)
- 2-3 tablespoons pesto (to taste)
- ½ to 2/3 cup shredded Mozzarella and Provolone cheese
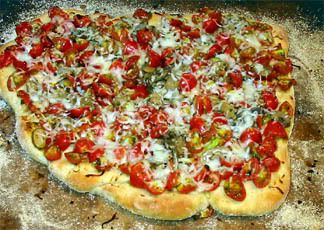
Preheat oven to 400. Mix pesto and tomatoes together in bowl until tomatoes are evenly coated with pesto. Top focaccia with tomato/pesto mixture and sprinkle cheese evenly over the top. Bake approximately 10 minutes until cheese is melted. Don't bake too long or the focaccia will burn! Although you can use a bakery focaccia, it's such an easy and quick bread to make, why not give it a try? Note that to make the focaccia pizza with homemade focaccia, you bake the bread halfway, remove from the oven, add the toppings, and finish baking. Pay close attention to that step; it keeps the bread from getting wet and mushy from the tomatoes.
Prep Time: 5 minutes
Cook Time: 25 minutes
Yield: 2
- 2 cups + 2 tablespoons bread flour
- 2 1/12 teaspoons dry yeast
- 1 teaspoon sugar
- ½ cup hot water (110 to 115 degrees)
- 2-3 tablespoons olive oil
- 1 teaspoon dried, minced garlic
- 1 teaspoon Italian seasoning
- ¼ teaspoon salt
Optional: If you have a baking stone, get it out and pour hot water over the top. Let it stand and absorb the water until the dough is ready to bake. This gives the bread a better, moister texture because the stone doesn't pull moisture out of the dough as the bread bakes. Mix yeast, sugar, and water in a small bowl and let it sit until mixture foams (about 10 minutes) Place 2 cups flour, olive oil, and yeast mixture in mixing bowl and use the dough hook to blend about 2 minutes. Add salt, garlic and Italian seasoning. Add additional water 1 tablespoon at a time if dough is too dry. The dough should look smooth and not feel sticky to the touch. If you accidentally add too much water, mix in a little additional flour again 1 tablespoon at a time until the dough feels right. There's no exact measurement to this final step. Dough changes according to the type of flour you use and even the humidity. Don't be afraid to feel it and adjust the flour/water measurements as needed. Place dough in large, oiled glass bowl (to keep dough from sticking to the bowl as it rises). Cover with either a wet towel or plastic wrap (neither should touch the dough!) and let it rise in a warm (80 degrees or so) place. If your kitchen is chilly, heat a cup of water in the microwave until the water boils. Then, place the dough inside the microwave. The yeast will love the warmth and humidity. Let dough rise until it doubles in size (about half an hour). When dough is almost finished rising, preheat oven to 450 degrees. wipe excess water off the baking stone and evenly spread 2-3 tablespoons cornmeal over the top or grease a 9x12 insulated baking pan. Sprinkle 2 tablespoons flour on a cutting board. Punch down the dough, remove it from the bowl, and knead it lightly on the cutting board. Flatten the dough and spread it out until it's about 1 ½ inch thick. Transfer the flattened dough to the baking stone (or baking sheet). Use a small brush and lightly brush cold water over the top of the dough. Bake focaccia for 15-20 minutes, until lightly browned on top. Serve warm!
Pesto Focaccia Pizza with Homemade Focaccia
- Mix tomatoes and pesto as noted above. Have the grated cheese ready.
- Follow steps 1-12 for homemade focaccia.
- Bake focaccia 7-10 minutes, until crust starts to form on the top.
- Remove bread from the oven and top with tomato/pesto mixture and cheese.
- Return focaccia to oven and cook for an additional 7-10 minutes.
- Slice and serve hot from the oven.
Prep Time: 5 minutes
Cook Time: 25 minutes
Yield: 2
- ½ pound dry pasta
- 1½ cups cherry tomatoes
- 1 large bell pepper, sliced into 2 inch chunks
- 2 tablespoons olive oil
- ½ teaspoon Italian seasoning
- dash of salt and black pepper
- 3-4 tablespoons pesto (to taste)
- 6-8 fresh basil leaves
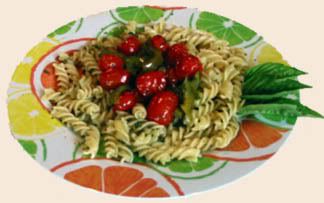
Preheat oven to 400 degrees. Place tomatoes and bell pepper chunks into a small bowl. Add olive oil and Italian seasoning. Stir until vegetables are evenly covered with oil and herbs. Pour the mixture into a small baking dish (use one with sides so you can stir during cooking without making a mess) and place in the oven. Roast for approximately 15 minutes until peppers have softened, but not charred. Stir several times. While the vegetables roast, cook pasta according to the package directions. Drain pasta and stir in pesto. The hot pasta makes it easier to evenly distribute the pesto. Place pasta on two dinner plates and top with roasted tomatoes and peppers. Garnish with several fresh basil leaves. Add salt and pepper to taste.
Freezing Pesto For Later
Pesto doesn't can well, but it freezes beautifully! It also keeps for quite a while in the refrigerator if you keep tightly covered. However, basil made in June and refrigerated won't be very tasty in December. Freeze the excess and enjoy that green taste of summer during the dark winter months.
As you've seen from these recipes, a little bit of pesto packs a powerful wallop of flavor. Mini-muffin tins (the kind that hold about ¼ cup of batter) are ideal for freezing a single serving of pesto that can be quickly defrosted and added to sauces or used alone.
- Spray muffin tin with non-stick cooking spray. This makes it easy to remove the pesto after it freezes.
- Spoon pesto into muffin tin and freeze.
- Remove frozen pesto by prying it out with a small spoon. If it doesn't want to release from the tin, quickly run a bit of hot water over the bottom of the tin; the pesto "muffins" should pop right out.
- Immediately place frozen pesto servings into a freezer bag.
If you're using it in a sauce or soup, you don't even have to defrost before using. Just add the frozen pesto to the hot liquid. Be very careful about defrosting in the microwave! Pesto has a lot of oil and heats quickly. In just a few seconds, you could end up with a slimy boiled mess. It's better to let it defrost on the counter. Sit it close to the warm stove and the small serving will defrost pretty quickly with no loss in quality.
The frozen pesto will keep at least 4-6 months. Maybe longer, but we always eat ours pretty quickly!
If you are harvesting large quantities of basil and want to freeze pesto for later use, here's another article with more tips on how to freeze pesto.
Are you looking for other healthy recipes? Check out our article on how to make guacamole dip. Its delicious and easy.




Wow, that pesto pizza looks fantastic. I’m making some tonight.
Thanks for the great ideas.
Chrisser